If you want to know how to make detroit style pizza, the secret is almost entirely in the pan and the proof. Detroit style is one of the most forgiving pizza styles for home bakers. There is no stretching a round, no launching off a peel, no 90-second bake window to nail. You press dough into a pan, let it rise, and bake. That is the basic pitch.
But getting that specific result - the airy, focaccia-like crumb, the crispy oil-fried bottom, and that deeply caramelized cheese crown running along every edge - takes more precision than most recipes let on. The dough itself is simple. The process around it is where people either end up with something transcendent or a dense, bready rectangle that just happens to have cheese on it.
This guide covers everything: the detroit pizza dough recipe from the PizzaLogic calculator, the science behind each step, the equipment that actually matters, and the specific mistakes that trip people up. Whether you have made fifty pan pizzas or this is your first one, there is something here for you.
What Makes Detroit Style Pizza Different
Before getting into the dough, it helps to understand what you are actually trying to build - because Detroit style is not just "thick pizza in a rectangle."
Detroit style pizza traces back to Buddy's Rendezvous (now Buddy's Pizza) in Detroit, Michigan, where Gus Guerra adapted his mother's Sicilian recipe in 1946. The twist was the pan. Instead of a standard sheet pan, Guerra used blue steel utility trays from nearby automotive plants - rectangular pans with tall, straight sides that conducted heat aggressively and created a completely different crust than anything a sheet pan could produce.
That origin story matters because it explains the three defining characteristics of the style:
The crust. Detroit style uses a high-hydration dough (typically 70-75%) that produces an interior closer to focaccia than traditional pizza - open, airy, and full of irregular holes. The bottom and edges crisp up from the oil in the pan and the fat rendering off the cheese, creating a fried-bread texture that is completely different from the soft, bready base of Chicago deep dish or the dense chew of Sicilian. If you have worked with high-hydration pizza dough before, the handling will feel familiar. If you have not, this is actually a great place to start because the pan does most of the structural work for you.
The cheese. Authentic Detroit pizza uses Wisconsin brick cheese - a mild, buttery, high-fat cheese that melts into a smooth, even layer and browns beautifully. The cheese gets pushed all the way to the edges of the pan, where it melts down the sides and fries against the hot steel. That caramelized cheese crust is called frico, and it is the single most distinctive thing about the style. Most home bakers substitute a combination of low-moisture mozzarella and a mild white cheddar or Monterey Jack, which gets close enough.
The sauce. Detroit pizza reverses the traditional topping order. Cheese goes directly on the dough, toppings go on the cheese, and the sauce goes on last - usually applied in thick racing stripes across the top rather than spread edge-to-edge. The sauce is typically a cooked, slightly sweet tomato sauce (not raw crushed tomatoes like a Neapolitan). This layering order is not just aesthetic. It insulates the dough from direct sauce moisture and keeps the interior crumb from turning gummy.
Detroit Style vs. Sicilian vs. Focaccia
These three get confused constantly, and the confusion is understandable - they are all thick, rectangular, baked in pans, and built on high-hydration doughs. But the differences matter.
Sicilian pizza is typically baked on a shallower sheet pan (not a deep steel pan), which produces a denser, sturdier, more bread-like crust. Many Sicilian recipes include semolina flour. The cheese sits on top of the sauce in the conventional order, and there is no frico edge. If you want to explore that direction, my post on focaccia from pizza dough covers the overlap between focaccia, Sicilian, and pan pizza styles.
Focaccia shares the most DNA with Detroit style. Both use high-hydration doughs, both get pressed into oiled pans, and both rely on a long second rise in the pan before baking. The difference is really about destination: focaccia is bread, Detroit style is pizza. The cheese-to-the-edges approach and the deep steel pan create a fundamentally different eating experience, even if the dough itself is nearly identical.
The Ingredients: Detroit Pizza Dough
This detroit pizza dough recipe makes one 546g dough ball, which is the right amount for a standard 10x14-inch Detroit style pan.
| Ingredient | Weight | Baker's % |
|---|---|---|
| Flour | 307g | 100% |
| Water | 221g (aim for ~80°F) | 72% |
| Salt | 8g | 2.5% |
| Instant Dry Yeast | 0.35g | 0.11% |
| Oil | 6g | 2% |
| Sugar | 3g | 1% |
Total dough weight: 546g
You can scale this recipe up or down using the PizzaLogic Detroit style dough calculator - just select the Detroit style preset and adjust the number of dough balls for how many pans you are running.
Ingredient Notes
Flour. Bread flour in the 12-13% protein range is ideal. You need enough gluten-forming protein to handle 72% hydration without the dough turning into soup, and bread flour delivers that. All-purpose can work in a pinch, but the crumb will be slightly denser and the dough will be harder to handle. King Arthur Bread Flour is a reliable choice. If you want to go deeper on flour selection, including the difference between protein percentage and the W-index, the best flour for pizza dough guide covers it all. Some Detroit recipes (including the Modernist Cuisine version) add a percentage of semolina flour for color and flavor - that is a legitimate variation worth experimenting with once you have the base recipe dialed in.
Water. 80°F is the target temperature here. Warmer water jumpstarts yeast activity, which matters because this recipe uses very little yeast and relies on a longer fermentation to develop flavor. If your kitchen runs cold, you can push the water temperature up to 85°F. If it runs warm (above 76°F), back off to 75°F. The pizza dough hydration guide goes deep on how water percentage affects crumb structure if you want to understand why 72% is the target here.
Yeast. 0.35g of instant dry yeast is a very small amount, and measuring it accurately on a standard kitchen scale is effectively impossible. Most kitchen scales cannot resolve below 1g with any consistency. If you do not already have one, a cheap jeweler's scale (the kind that reads to 0.01g) solves this problem permanently. I wrote a whole piece on why serious pizza makers need two scales - it is one of the most cost-effective upgrades you can make. If you want to substitute active dry yeast or fresh yeast, the best yeast for pizza dough guide has conversion charts and timing adjustments.
Salt. 2.5% is standard. Salt controls fermentation rate, strengthens the gluten network, and obviously affects flavor. Do not skip it or reduce it significantly. Use fine sea salt or table salt for even distribution - coarse salt dissolves unevenly and can leave pockets of saltiness and blandness.
Oil. 6g (about 2% of flour weight) in the dough contributes a small amount of tenderness to the crumb. This is separate from the oil you will use to grease the pan - that is a much more generous amount and plays a structural role in creating the crispy bottom.
Sugar. 1% sugar feeds the yeast during the early stages of fermentation and promotes browning during the bake. It is a small amount, but it makes a noticeable difference in crust color.
Step-by-Step: The Detroit Pizza Dough Recipe
Making great detroit style pizza dough breaks down into four phases: mixing, fermenting, pan proofing, and baking. None of them are difficult, but the timing between them matters.
1. Mix and Autolyse
Combine your 307g of flour and 221g of water in a large bowl. Mix with a fork or your hands until no dry flour remains. It will look rough and shaggy - that is fine. Cover the bowl with plastic wrap or a damp towel and let it rest for 20 to 30 minutes.
This resting period is called an autolyse. During those 20-30 minutes, the flour is absorbing water and gluten is beginning to develop on its own, without any mechanical input from you. The result is a dough that is more extensible (easier to stretch without tearing) and requires significantly less kneading to reach full development. At 72% hydration, autolyse is not optional - it is the difference between a dough that cooperates and one that fights you the entire way.
For a deep dive into the science behind this step - what is actually happening at the molecular level and when autolyse helps versus when you can skip it - check out how to autolyse pizza dough.
2. Add Yeast, Salt, Sugar, and Oil
After the autolyse, sprinkle your 0.35g of instant dry yeast over the surface of the dough. Mix it in briefly with your fingers or a fork, just enough to distribute it.
Then add your 8g of salt, 3g of sugar, and 6g of oil. Mix everything together in a stand mixer on low speed for 2 to 3 minutes. You are looking for a dough that is smooth, shiny, and pulls away from the sides of the bowl. It will still be quite sticky - that is correct for 72% hydration. If you are mixing by hand, use a wet hand and a squeezing/folding motion in the bowl for about 5 minutes until the dough comes together and feels cohesive.
Why add yeast before salt? Salt in direct contact with undissolved yeast can stress or kill yeast cells. Giving the yeast 30 seconds to hydrate before the salt hits provides a buffer. This is a small detail, but at 0.35g of yeast you do not have a large margin for error - every cell counts.
A note on the recipe card numbers: The PizzaLogic calculator generates precise decimal values (like 7.69g salt or 3.07g sugar) based on exact baker's percentages. For this guide, the numbers are rounded to whole grams for readability. Either set works fine - the difference between 8g and 7.69g of salt will not meaningfully change your results.
3. Stretch and Folds
Cover the dough and let it rest at room temperature (around 72°F). Over the first 1 to 2 hours, perform 3 to 4 sets of stretch-and-folds, spacing them about 30 minutes apart.
Here is the technique: wet your hands, grab one side of the dough, stretch it upward until you feel resistance, and fold it over to the opposite side. Rotate the bowl 90 degrees and repeat. Do this four times per set (one fold from each direction).
You will notice the dough changing with each set. The first set will feel loose, slack, and barely cooperative. By the third or fourth set, the dough should feel noticeably smoother, stronger, and more elastic. It will start to hold its shape instead of spreading out flat. That transformation is gluten development happening in real time.
Stretch-and-folds are the preferred method for building structure in high-hydration doughs because they are gentler than traditional kneading. Aggressive kneading at this hydration level tends to result in a sticky mess coating your hands and counter. The fold method keeps the dough contained in the bowl and builds strength incrementally.
4. Shape and Bulk Ferment
After your last stretch-and-fold, gently shape the dough into a smooth ball. The technique: fold the edges of the dough underneath itself from all four sides, flip it seam-side down, and use cupped hands to gently drag it across the surface (slightly damp, no flour) to create surface tension on top. It does not need to be perfect. The pan will do the final shaping.
Place the ball in a lightly oiled container, cover it, and let it rise at room temperature (~72°F) for approximately 4 hours. The dough is ready when it has roughly doubled in size and feels puffy and airy throughout.
The poke test: Press a floured fingertip about half an inch into the dough. If it springs back slowly (over 2-3 seconds) and leaves a slight indentation, it is ready. If it snaps back instantly, it needs more time. If it does not spring back at all and the dent stays put, it may be over-proofed - though with this low yeast amount, over-proofing during bulk fermentation at room temp is unlikely within a reasonable window. For a full breakdown of proofing indicators and troubleshooting, see the complete guide to proofing pizza dough.
Total bulk ferment time: approximately 6 hours (including the 1-2 hours of stretch-and-folds). Your actual timing will vary based on room temperature, water temperature, and yeast activity. Warmer environments speed things up. Cooler environments slow them down. Watch the dough, not the clock.
Can You Cold Ferment Detroit Style Dough?
Absolutely - and it will improve the flavor. After the stretch-and-fold phase (about 1-2 hours into the bulk ferment), you can transfer the dough to an oiled container and refrigerate it for anywhere from 24 to 72 hours. The cold slows fermentation dramatically, giving enzymes more time to break down starches into sugars and proteins into amino acids. The result is a more complex, slightly tangy, deeper-flavored crust.
When you are ready to use it, pull the dough from the fridge and let it come to room temperature for about 1.5 to 2 hours before pressing it into the pan. Cold dough is tight and elastic - it needs time to relax before it will cooperate with shaping.
If cold fermentation is new to you, the cold ferment pizza dough guide covers the full process - timing, yeast adjustments, and how to tell when cold-fermented dough is at its peak versus past its prime.
The Pan: Why It Matters More Than You Think
The pan is not a nice-to-have for Detroit style. It is structurally essential to the style.
Traditional Detroit pizza is baked in blue steel pans - the same material as those original automotive utility trays. Steel conducts heat aggressively, which is what gives the bottom crust its fried-bread crispness and what caramelizes the cheese along the edges into proper frico. A standard aluminum 9x13 baking pan will produce an edible pizza, but it will not produce a Detroit style pizza. The bottom will be softer, the edges will lack that deep golden crunch, and the overall result will be closer to a generic pan pizza.
The LloydPans Detroit Style Pizza Pan (either the 10x14 or the 8x10) is the standard recommendation for good reason. They are made from hard-anodized aluminum with a pre-seasoned dark coating that mimics the heat absorption of blue steel, they have the right wall height (about 2.5 inches), and they are effectively nonstick from the first use. If you are only going to buy one pan, the 10x14 is the one to get - it is the traditional Detroit format and the right size for this 546g dough ball.
If you are using a standard 9x13 pan: It will work, but oil it very generously. The lighter-colored metal does not absorb and radiate heat as efficiently, so your bottom crust will need more help. Placing the pan on a preheated baking steel or pizza stone on the lowest oven rack can partially compensate for the heat transfer difference. Do not use a glass baking dish. Glass does not conduct heat quickly enough and will give you a pale, soft bottom.
Pan Proofing and Baking Your Detroit Pizza Crust
This is where the detroit pizza crust recipe comes together. The pan proof, the parbake, and the final bake are three distinct steps, and each one matters.
Prep the Pan
Add 2 to 3 tablespoons of oil to the pan and use your hands to coat the bottom and sides completely. You want a generous, visible layer on the bottom - this oil is going to fry the base of the dough as it bakes. Olive oil, vegetable oil, or a blend both work. Some people use melted butter or a butter-oil mix for additional flavor.
Shape in the Pan
Turn your fermented dough ball out into the oiled pan. Using oiled fingertips, gently press and stretch the dough outward toward the corners. Do not force it. If the dough resists and keeps snapping back, cover it and let it relax for 15-20 minutes, then try again. At 72% hydration, the dough should be cooperative - but if it has been cold fermented or has not fully tempered to room temp, it may need a couple of rest-and-stretch cycles to reach the edges.
The goal is an even layer of dough that reaches all four corners and runs about halfway up the sides of the pan. Do not worry about getting it perfect - the final proof will fill in any gaps.
Pan Proof
Cover the pan (plastic wrap or a clean towel works) and let the dough proof right there in the pan for 2 to 3 hours at room temperature. You are waiting for the dough to roughly double in height, become very puffy, and develop a pillowy, jiggly quality when you gently shake the pan. The dough should look alive.
This is the proof that defines the crumb. A short pan proof produces a dense, bready interior. A full pan proof produces that open, airy, focaccia-like crumb with irregular holes. Do not rush it.
While the dough proofs, preheat your oven.
Preheat
Set your oven to 500-525°F (260-275°C). If you have a baking steel or pizza stone, place it on the lowest oven rack and let it preheat for at least 45 minutes to an hour. The steel/stone acts as a heat reservoir that will blast the bottom of the pan with consistent, intense heat - this is how you get a deeply crispy bottom crust even in a home oven.
If you do not have a steel or stone, the lowest rack position still gives you the best results. You do not need to preheat the pan itself.
The Parbake
This is a crucial step that most quick Detroit recipes skip - and it is the single biggest reason home versions end up with a gummy, undercooked center.
Once the dough has finished its pan proof, place the pan directly in the oven (on the steel/stone if you have one) and bake the plain dough - no toppings - for 8 to 10 minutes. You are looking for the surface to set, lose its raw sheen, and just start to turn golden around the edges. The dough should feel firm to the touch but not deeply browned.
What parbaking does: it creates a moisture barrier on the surface of the dough. When you eventually add sauce and cheese, that barrier prevents the liquid from soaking into the crumb and creating the dreaded gum line - that layer of raw, pasty dough hiding beneath the toppings. With a heavy topping load like Detroit style demands, parbaking is not optional. It is the difference between a crispy, fully-baked crust and a soggy mess in the middle.
For a complete breakdown of why parbaking works, when to use it across different pizza styles, and detailed timing charts for different oven setups, check out how to parbake pizza crust.
Remove the parbaked crust from the oven and let it cool for just a couple of minutes before adding toppings.
Toppings and Assembly
Here is the traditional Detroit style topping order, from bottom to top:
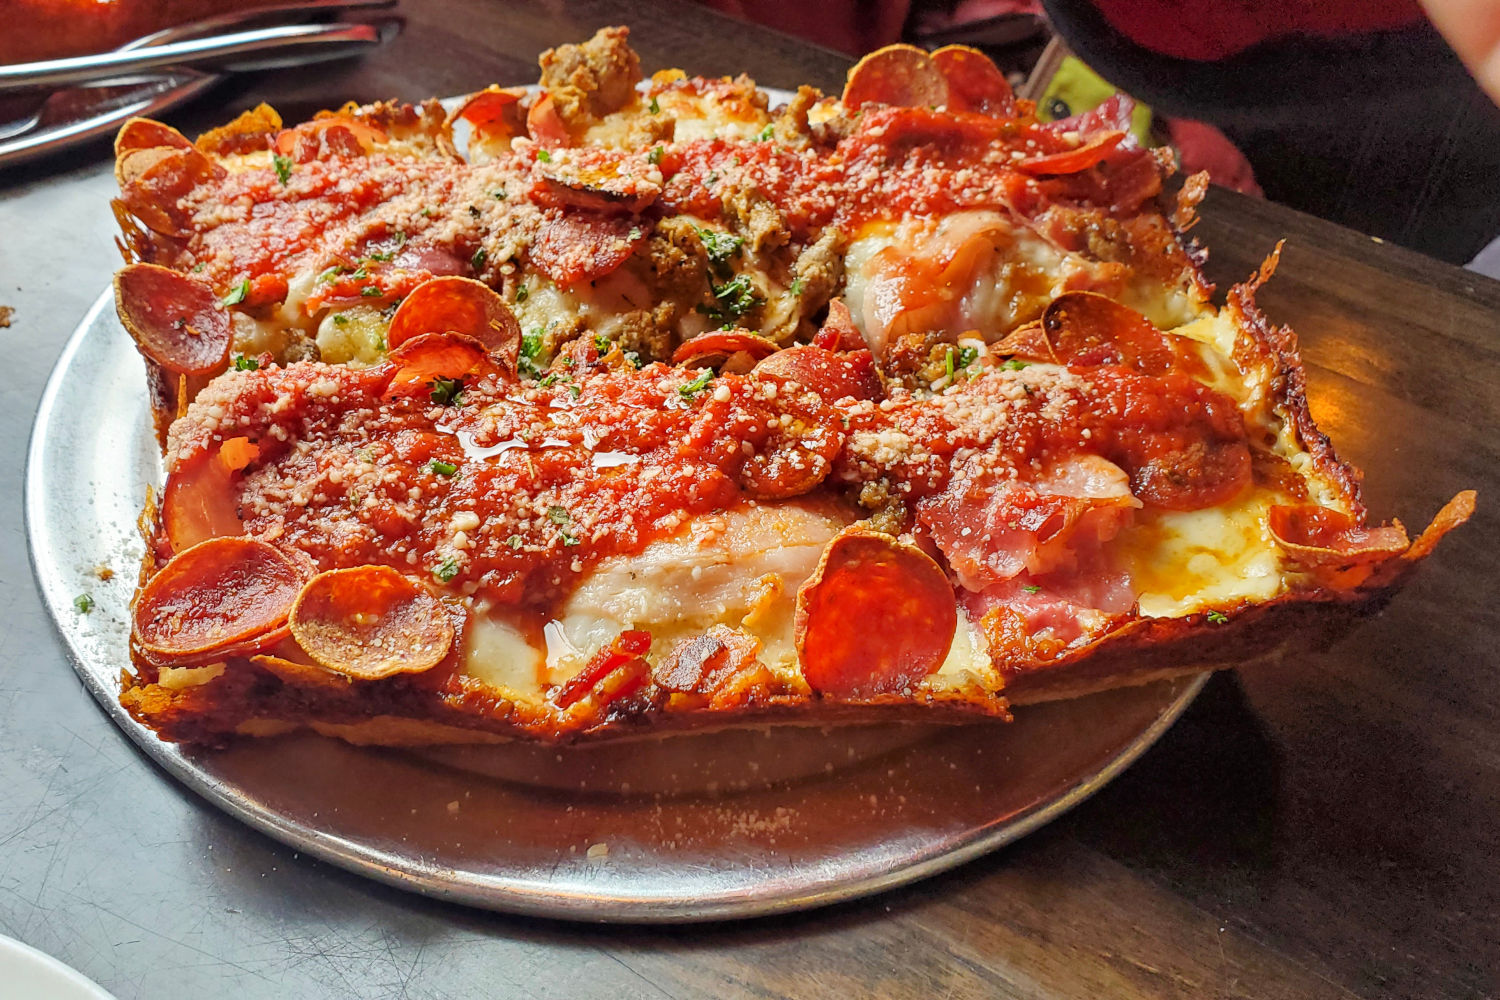
1. Cheese (directly on the dough). Use cubed or shredded cheese and push it all the way to the edges of the pan - right up against the walls. This is non-negotiable. The cheese that touches the hot pan walls melts, renders its fat, and fries into the frico crust. If you leave a gap between the cheese and the pan edge, you do not get frico. For authentic results, use Wisconsin brick cheese. For a more accessible substitute, a 50/50 mix of low-moisture mozzarella and a mild white cheddar or Monterey Jack gets you in the ballpark.
2. Toppings (on the cheese). Pepperoni is the classic Detroit topping, and cup-and-char pepperoni is especially good here because it crisps up on top of the cheese layer. Sausage, green peppers, onions, mushrooms - whatever you like. Just keep the total topping volume reasonable. Overloading prevents the cheese from melting properly and can weigh down the crust.
3. Sauce (on top of everything else). This is the Detroit signature. Apply thick stripes of sauce across the top of the pizza in two or three parallel racing stripes. Do not spread it edge to edge - the stripes create pockets where the cheese can still brown between the sauce lines, and the visual contrast is part of the appeal. Use a cooked, slightly sweet tomato sauce. Raw crushed tomatoes are too thin and will pool and soak through.
The Final Bake
Return the loaded pan to the oven and bake for another 8 to 10 minutes. You are looking for the cheese to be fully melted, bubbly, and beginning to brown on top. The frico edges should be a deep golden brown - almost dark enough to make you nervous. That is the right color. The crust needs that aggressive browning to develop the crunch.
If your oven has a broiler, you can hit it for the last 60 to 90 seconds to push the top browning further. Keep a close eye on it - the jump from perfectly browned to burnt happens fast under a broiler.
Finishing
Pull the pan from the oven and let the pizza rest in the pan for 3 to 5 minutes. Run a thin spatula or butter knife around the edges to release the frico from the pan walls. Then slide the entire pizza out onto a cutting board. Cut into squares (not triangles - this is Detroit style, not a round pie) and serve immediately.
Troubleshooting Common Problems
The dough won't stretch to the corners. It is too tight, either from being cold or from insufficient rest time. Cover it and wait 15-20 minutes, then try again. At 72% hydration with a proper autolyse and stretch-and-fold regimen, the dough should reach the corners without much fight. If it is consistently too elastic, you may need a longer bulk ferment or a longer autolyse.
The center is gummy or underbaked. You either skipped the parbake or did not parbake long enough. This is the most common Detroit style failure mode at home. Always parbake, and do not pull it early just because the edges are browning faster than the center. If you are finding that the edges brown before the center is set, try dropping the oven temp 25°F.
No frico (no caramelized cheese edge). The cheese was not pushed to the pan edges, or the cheese you used does not have enough fat content to render and fry. Make sure the cheese makes direct contact with the pan walls. Pre-shredded cheese is also a culprit here - it is coated in anti-caking starches that inhibit melting and browning. Shred or cube your own from a block.
The bottom crust is soft, not crispy. The pan is not hot enough. Place it on a preheated baking steel or stone on the lowest rack. If you are using a light-colored aluminum pan, switch to a dark-coated pan (like a LloydPan) or increase the oil on the bottom. The oil in the pan should be sizzling when you put the dough in for the parbake.
The dough is not rising in the pan. Either the yeast was dead to begin with, the salt killed it during mixing, or your room temperature is too cold. Check the dough not rising troubleshooting guide for a systematic walkthrough of every possible cause. At 0.35g of yeast, the rise is slow by design - give it the full 2-3 hours before deciding something is wrong.
Over-proofed dough that has collapsed. This is actually not a disaster with Detroit style. Because the dough is in a pan, you can gently press it back down, redistribute it, and let it re-proof for another hour or so. The structure will not be as open as a perfectly timed proof, but it will still produce a very edible pizza. This forgiving nature is one of the best things about the style.
Making This Dough Ahead of Time
Detroit style pizza is extremely batch-friendly, which makes it ideal for parties, meal prep, and pizza nights where you want to minimize day-of effort.
Dough storage. After the bulk ferment (or after the stretch-and-fold phase if cold fermenting), the dough can go into the fridge for up to 72 hours. Beyond 3 days, the yeast will have consumed most of the available sugars and the dough will start to taste overly acidic and perform poorly. For storage details, see how long does pizza dough last in the fridge.
Freezing the dough. You can freeze the dough ball after the bulk ferment. Wrap it tightly in plastic wrap, then a freezer bag, and freeze for up to 3 months. Thaw overnight in the fridge, then bring to room temperature before pressing into the pan. The rise may not be quite as dramatic as fresh dough, but the results are still solid. The freezing pizza dough guide and thawing guide cover the full process.
Freezing a parbaked crust. This is actually the best make-ahead strategy for Detroit style. Parbake the crust, let it cool completely, wrap it, and freeze it. When you want pizza, pull it out, add toppings to the frozen crust, and bake directly from frozen - just add 3 to 5 extra minutes to the final bake time. You skip the entire mixing, fermenting, and proofing process and go straight to toppings and oven. This is the move if you want weeknight Detroit pizza on demand.
Leftover dough. If you have extra dough that you do not want to make into another pizza, it makes excellent focaccia, garlic knots, or breadsticks. At 72% hydration, it is already in the ideal range for focaccia with no modifications needed.
Equipment Summary
Here is what you actually need, separated from what is nice to have.
Essential: A Detroit style pan (or at minimum, a dark metal 9x13 pan). A kitchen scale. An oven that reaches 500°F.
Highly recommended: A jeweler's scale for measuring yeast. A baking steel or pizza stone for bottom heat. A stand mixer (though hand mixing works at this hydration). An instant-read thermometer for water temperature.
Not needed: A pizza peel. A pizza screen. A rolling pin (do not roll this dough). Any special shaping skills - the pan handles it.
That is how to make detroit style pizza at home. Let it rest for a few minutes after pulling it from the oven, run a spatula along the edges to free the frico, cut into squares, and enjoy the best pan pizza you have ever made.
Build your own Detroit style recipe with the PizzaLogic Dough Calculator - just select the Detroit preset and adjust for your pan size.