You made the dough, covered it, and walked away. An hour later you lift the cloth and find the same dense lump you started with. That moment - that specific frustration - is exactly why this guide exists.
Pizza dough not rising is almost always fixable once you know where to look. Yeast is a living organism, and it has preferences. Get the conditions wrong and it either goes dormant, struggles, or dies altogether. Get them right and you end up with exactly the kind of puffy, airy dough that makes great crust possible.
Here is every reason it might be failing you, ranked roughly from most to least common, plus what to do about each one.
Quick Diagnosis: What Does Your Dough Look Like Right Now?
Before running through the full list, take a quick read of your situation:
- Completely flat, no change at all after an hour or more at room temp - yeast is likely dead, or salt made direct contact with it, or water was too hot
- Slightly puffy but barely moved - environment is probably too cold, or you used very little yeast intentionally
- Rose well earlier but looks collapsed or sunken - it over-proofed; see the section on that below
- Dough feels rock-solid and stiff - likely too much flour, which physically prevents the gluten network from expanding
- Pulled from the freezer and going nowhere - thawing issue; jump to the frozen dough section
1. The Yeast Is Dead
This is the most common reason, and it usually comes down to one of two things: age or temperature.
Age: Yeast has a shelf life. Active dry yeast and instant yeast both degrade over time, especially once a package is opened. A jar that has been sitting in the back of your pantry for over a year - even unopened - might be significantly weaker than the label suggests. Always check the expiration date before using.
Water too hot: If your water is above about 120°F (49°C), it will kill yeast on contact. The sweet spot for active dry yeast is 100°F to 110°F (38°C to 43°C) - warm to the touch but not hot. Instant yeast is a little more forgiving and can handle slightly cooler water fine, but it is still vulnerable to heat. If you guessed at the temperature instead of measuring, overheating is a real possibility.
The fix: before you start a new batch, test your yeast. See the section at the bottom on how to do that in about ten minutes.
If you are unsure which type of yeast to buy and how each one behaves differently, the guide to the best yeast for pizza dough covers all of them in detail.
2. You Didn't Proof Your Active Dry Yeast (And Should Have)
This one catches a lot of people. Active dry yeast and instant yeast are not interchangeable in terms of how you handle them.
Instant yeast - sometimes called rapid-rise or bread machine yeast - can go directly into your dry ingredients. It does not need pre-activation.
Active dry yeast is different. It has a thicker coating around the yeast granules that needs to dissolve before the yeast can activate. If you throw active dry yeast straight into flour without proofing it in warm water first, it can take a long time to get going - or it may never fully activate, depending on conditions. The standard approach: dissolve it in warm water (with a small pinch of sugar if you want to speed things up) and let it sit for 5 to 10 minutes until it is foamy. No foam means the yeast is not viable.
A lot of recipes skip this step because they assume you are using instant yeast, which is by far the more common choice for pizza at home. If your recipe says "just mix it in" but you grabbed active dry, that is likely your problem.
3. Your Kitchen Is Too Cold
Yeast activity is directly tied to temperature. Below about 50°F (10°C), yeast essentially stops working. Between 50°F and 70°F it works slowly. The ideal range for a room-temperature rise is 75°F to 80°F (24°C to 27°C).
If your kitchen runs cold - especially in winter - your dough will rise eventually, just on a much longer timeline than most recipes account for. Two hours in a 65°F kitchen might produce the same rise as 45 minutes in a warmer one. The complete guide to proofing pizza dough covers how temperature affects every stage of the process.
The fix: find a warmer microclimate in your kitchen. Good options:
- Top of the refrigerator (often a few degrees warmer than ambient)
- Inside a turned-off oven with just the oven light on (the bulb generates enough warmth to create a solid proofing environment - usually around 75°F to 80°F)
- A proofing drawer if your oven has one
- A large bowl of just-boiled water placed in the oven alongside your covered dough - this creates a humid, warm environment that works really well
One important note: if you are doing a deliberate cold ferment, a lack of visible rise in the fridge on day one is completely normal. That is the whole point - slowing fermentation way down so the flavor compounds have time to develop. If that method interests you, the cold fermentation guide walks through the timing in detail.
4. Salt Made Direct Contact With the Yeast
Salt is essential for flavor and gluten structure, but it is also hygroscopic - it draws moisture out of whatever it touches. If you add your salt directly on top of the yeast before there is enough water and flour to buffer the contact, you can dehydrate the yeast cells and seriously impair them before your dough even comes together.
This is especially risky if you bloom your yeast in water and then immediately pour salt into the same bowl.
The fix: two solid approaches. First, dissolve your yeast in water, let it bloom, then mix it with most of your flour before adding salt. Second, whisk the salt thoroughly into the dry flour first, so by the time it hits the yeast, it is well dispersed and buffered. Either method works.
5. Your Dough Is Too Stiff
This one is underrated as a cause. If you added too much flour during mixing or kneading, the dough can end up so tight and dense that even healthy, active yeast cannot push it up effectively.
When yeast produces CO2 gas, that gas needs to get trapped in the gluten network to create rise. If the dough is stiff and dry, the gluten does not have enough extensibility to stretch around those gas bubbles. The result looks like flat dough, even though the yeast may be perfectly fine.
Signs your dough is too stiff: it tears instead of stretching when you pull it, it feels more like modeling clay than soft bread dough, and it might even feel warm from the friction of kneading rather than the heat of fermentation.
The pizza dough hydration guide covers the right water-to-flour ratios for different styles, which is worth reading if you tend to add flour freely during kneading.
6. Your Tap Water Has Too Much Chlorine
This one is less common but real, especially in certain municipal water systems. Chlorine is added to tap water to kill microorganisms - and yeast, technically, is a microorganism. In high concentrations, chlorinated water can noticeably inhibit yeast activity and slow fermentation.
If you have ruled out everything else and your dough consistently underperforms, try switching to filtered water or bottled spring water for one batch and see if it makes a difference. For most home bakers in most places, this is not a significant factor - but for people who bake frequently and live somewhere with heavily treated water, it can add up.
7. Too Much Sugar (Or the Wrong Ratio)
Sugar feeds yeast, which is why a pinch of it is sometimes added to the proofing water - it gives the yeast a quick energy source while it activates. But too much sugar actually has the opposite effect. High sugar concentrations (above about 10% of flour weight) create an osmotic environment that draws water out of yeast cells, inhibiting their activity.
For a standard pizza dough, sugar is either absent or used in very small amounts (typically 1 to 2% of flour weight). If you are following a recipe that calls for more sugar than that, or if you accidentally doubled it, that could be contributing to slow fermentation.
On the flip side, if your recipe calls for a small amount of sugar and you left it out entirely while also using active dry yeast, you may just have a slower start than expected - which is fine. The dough will still rise, just more gradually.
8. You Haven't Waited Long Enough
Sometimes the dough is fine. You just need more patience.
If you are working with a very low yeast percentage - say, 0.1% to 0.2% of flour weight, which is common in Neapolitan-style recipes and any recipe designed for an extended ferment - the timeline stretches out significantly. That same dough that doubles in 90 minutes at 0.5% yeast might take 12 to 16 hours at 0.1%.
Pre-ferment styles like biga and poolish are also inherently slow. A stiff biga at 45% hydration with minimal yeast can look pretty inert for the first several hours. That is normal. The activity is happening, just not dramatically. If you are working with a poolish or biga for the first time, the poolish guide and biga guide are both worth bookmarking before you start.
The best way to evaluate whether dough has proofed enough is the poke test: poke the dough about half an inch with a floured finger and watch the indent. If it springs back quickly and completely, the dough needs more time. If it springs back slowly and about halfway, it is ready. If it does not spring back at all, you have over-proofed - which brings us to the next one.
9. The Dough Over-Proofed and Collapsed
This is the sneaky one. You walk away, come back too late, and find your dough flat. But it did rise - it just went past its peak and fell.
When dough over-proofs, the yeast exhausts its food supply and the CO2 bubbles overinflate and then pop. The gluten network, which was already stretched tight, can no longer hold the structure. The dough deflates and may smell strongly of alcohol.
Over-proofed dough is flat, but it has a different texture than never-rose dough. It tends to be very slack, sticky, and almost translucent in spots. It also smells noticeably boozy.
Can you rescue over-proofed dough? Sometimes. If it only slightly over-proofed, you can gently reshape it, allow the gluten to redistribute, and give it a short second proof of 30 to 45 minutes. The complete proofing guide covers how to tell when dough is perfectly proofed so you can catch it before it goes too far. Do not expect a dramatic rise - you are just trying to rebuild some structure. If it severely over-proofed and collapsed, it is better to either roll it thin and use it as flatbread or focaccia-style, or cut your losses.
10. Frozen Dough That Won't Wake Up
Frozen pizza dough not rising after thawing is a specific and common frustration. Here is what is happening: freezing kills some percentage of the yeast outright, and the surviving yeast goes into deep dormancy. When you thaw, that yeast needs time to revive and build back up to normal activity levels.
The mistake most people make is thawing too fast. If you pull frozen dough out and try to use it at room temperature within a couple of hours, the outside warms up and starts getting sticky while the core is still partially frozen. The yeast never gets a chance to properly restart, and the uneven temperature makes the dough handle terribly.
The right approach:
- Transfer from freezer to fridge the night before - slow overnight thaw in a cold environment is ideal
- The next day, take it out and let it sit at room temperature for at least 2 to 3 hours before stretching
- It should feel soft, slightly tacky, and show at least a little puff before you try to work it
For the full method on both freezing and thawing, how to freeze pizza dough and how to thaw frozen pizza dough have you covered.
How to Test If Your Yeast Is Alive
Before starting a batch, take two minutes to proof your yeast. This works for active dry yeast and will also confirm whether instant yeast is still viable.
The test:
- Combine 1/4 cup (60ml) of warm water (100°F to 110°F / 38°C to 43°C) with 1 teaspoon of yeast and a pinch of sugar
- Stir briefly and let it sit for 10 minutes undisturbed
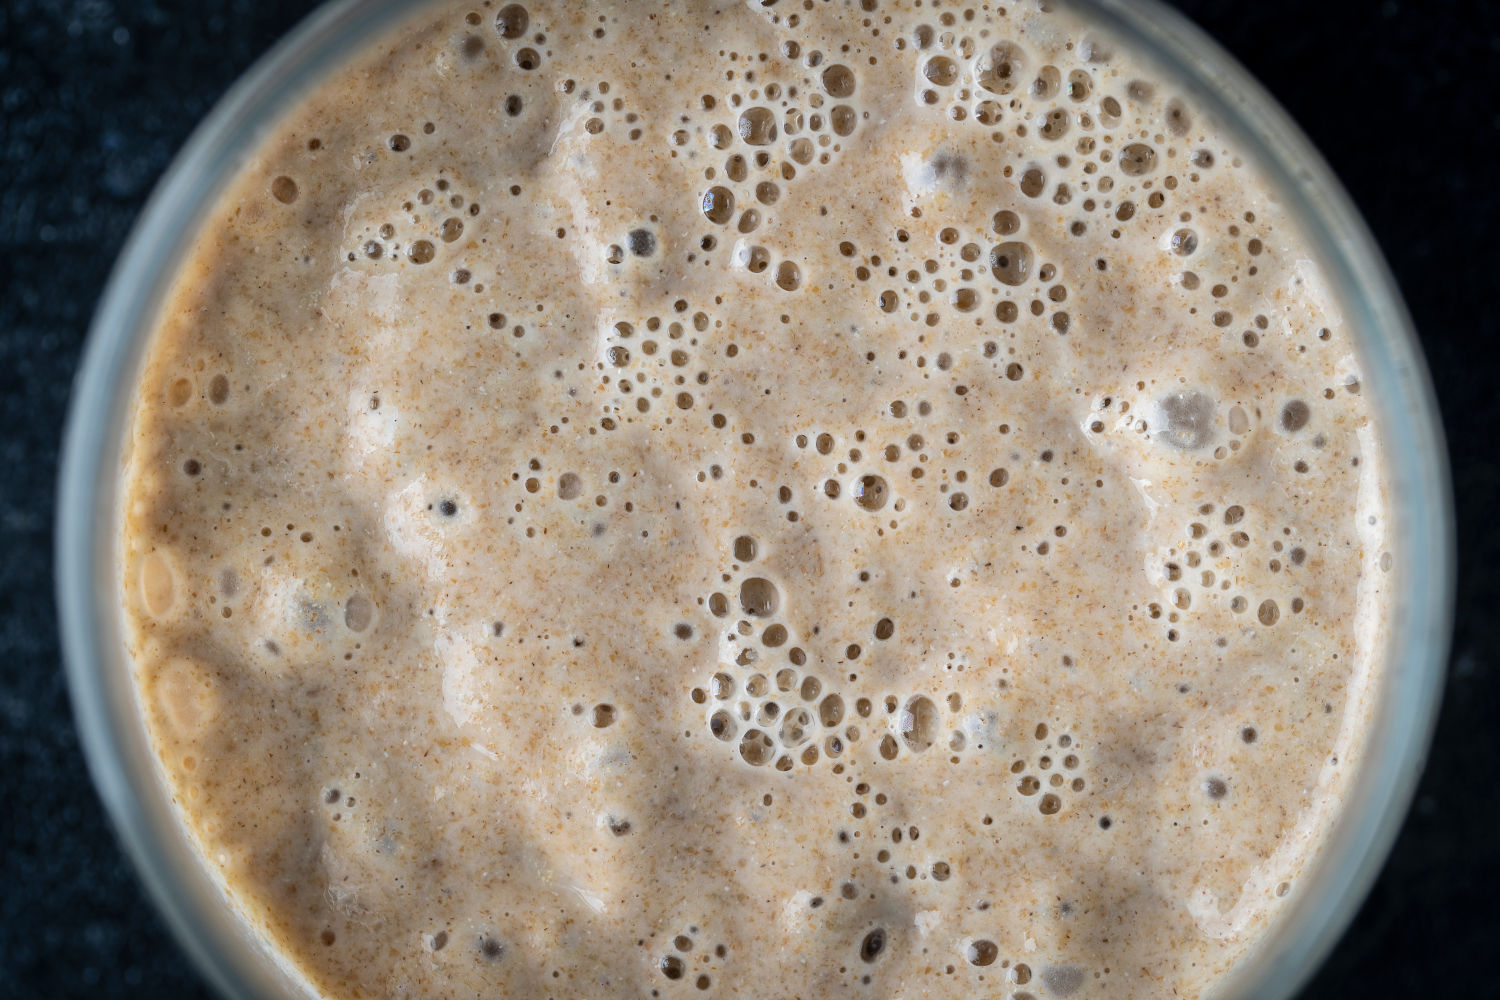
- After 10 minutes, it should be noticeably foamy and domed - it might even smell a bit like beer
If you see foam, your yeast is alive and active. If the surface is flat and nothing happened, the yeast is dead or severely weakened and you should replace it before proceeding.
This is an especially useful habit if you buy yeast in bulk and store it for extended periods.
Can You Save Flat Dough?
It depends on why it is flat.
If the dough is just cold: move it somewhere warmer and give it another 30 to 60 minutes. There is a good chance it comes around.
If you forgot the yeast entirely: this is surprisingly hard to fix after the fact. Kneading yeast into already-formed dough does not distribute it evenly, and the gluten structure resists the disruption. It can work with persistence, but it is frustrating and unreliable. Better option: dissolve your yeast in a small amount of warm water, flatten the dough, spread the yeast water over it, fold it repeatedly until incorporated, then re-ball and proof again. Results vary.
If the yeast was definitively dead: you cannot save it by adding more yeast to the same dough for the reason above. Your best move is to roll it out and lean into what it actually is - an unleavened flatbread. Brush it with olive oil, add toppings, and bake it at high heat. Pita-style is also an option. If you would rather pivot to a dough recipe that skips yeast entirely, pizza dough without yeast covers a baking powder method that actually produces a decent crust in under 30 minutes.
If it rose beautifully and now you have extra: keep this list of things to do with leftover pizza dough bookmarked. Garlic knots, calzones, focaccia - there are a lot of good options.
Prevention Checklist
If you have dealt with this more than once, a quick pre-bake checklist helps:
- Check the yeast expiration date before starting
- Measure water temperature with a thermometer - don't guess
- If using active dry yeast, bloom it in warm water first; don't add it dry
- Add salt to flour, not directly to yeast water
- Go easy on flour during kneading - dough should be soft and tacky, not stiff
- Consider using filtered water if your tap water is heavily chlorinated
- Give the dough enough time - check with the poke test, not just the clock
Most of these problems come down to temperature (water too hot, room too cold) or yeast health (expired, improper handling). Fix those two things and the rest tends to sort itself out.
When the dough is behaving, the crust is worth it.