If you have ever grabbed a bag of whole wheat flour, swapped it into your regular pizza dough recipe, and hoped for the best, you already know how that story ends. Dense. Flat. Dry. Something closer to a frisbee than a pizza crust. It is a rite of passage for home pizza makers, and it is almost always followed by the same question: can I use whole wheat flour for pizza dough without ruining everything?
Yes. But not by treating it like white flour and crossing your fingers.
Whole wheat behaves differently at every stage - mixing, hydrating, fermenting, stretching, baking. Once you understand why, you can make a whole grain pizza crust that is nutty and complex without being heavy or cardboard-like. The kind of crust that actually makes people stop and ask what you did differently.
This guide covers all of it. The flour science, the hydration adjustments, the techniques that matter, the mistakes that will sink you, and a framework recipe to get you started. If you are looking for the quick version of how to make a whole wheat pizza crust: bump your hydration to at least 70%, autolyse for 30 to 60 minutes, start with a 30% whole wheat blend, and cold ferment for 24 to 48 hours. If you want to understand why each of those things matters and how to push further, keep reading.
What Makes Whole Wheat Flour Different
To understand why your whole wheat pizza dough keeps coming out wrong, you need to know what is actually in the bag.
Regular white flour - whether it is all-purpose, bread flour, or 00 - is milled from just the starchy endosperm of the wheat berry. That is the part that gives you smooth, predictable, easy-to-work-with dough. Whole wheat flour contains the entire wheat berry: the endosperm, the germ, and the bran.
Each of those extra components changes the dough in a specific way.
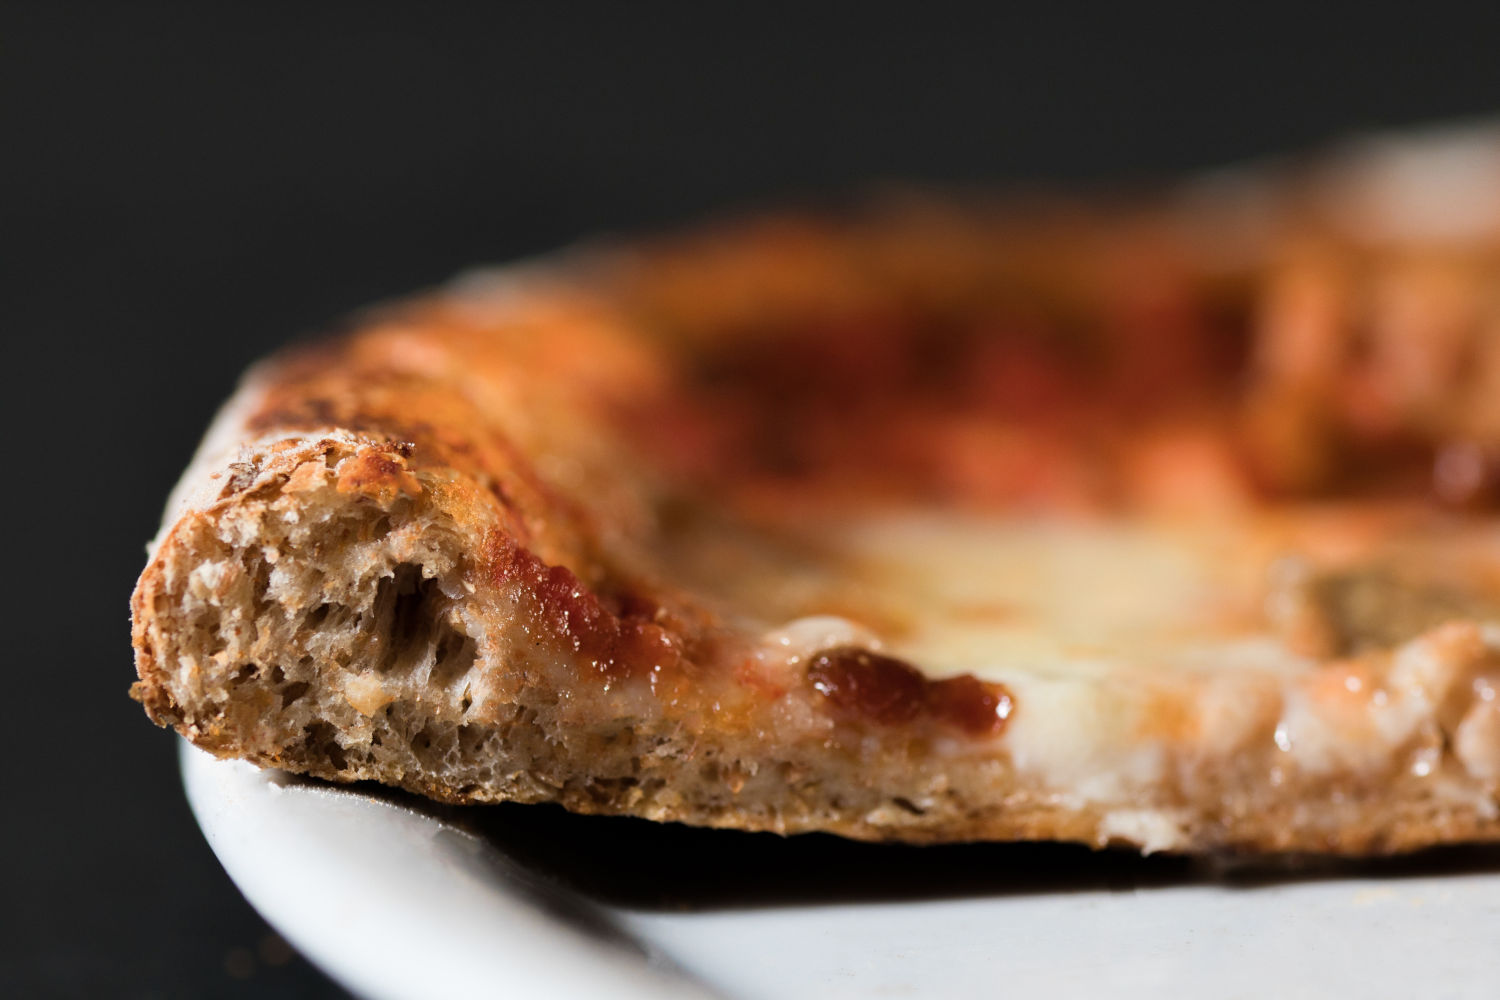
The bran is the fibrous outer layer, and it is the biggest troublemaker. Those bran particles are sharp and coarse. When you knead your dough and the gluten network starts to develop - all those long, stretchy protein strands linking together - the bran acts like tiny shards of glass slicing through them. Less gluten structure means less gas retention, which means a denser crust with less oven spring.
Bran is also extremely absorbent. It soaks up water like a sponge, which is why a whole wheat dough mixed at the same hydration as a white flour dough will feel noticeably drier and stiffer. That water gets locked up in the bran instead of hydrating the gluten proteins.
The germ is the embryo of the wheat plant, and it is rich in oils and fats. Those oils interfere with gluten development by literally lubricating the protein strands and making it harder for them to bond. The germ also contains glutathione, a compound that weakens the gluten network further. This is the same compound that makes instant yeast slightly relax gluten, but in the germ it is present in larger quantities.
The result of all this: whole wheat flour produces a dough that is thirstier, weaker in structure, harder to stretch, quicker to tear, slower to rise, and denser when baked. That is a lot of obstacles. But every single one of them has a workaround.
Choosing the Right Whole Wheat Pizza Flour
Not all whole wheat flour is the same, and picking the right one makes a real difference.
Red Wheat vs. White Wheat
Most "whole wheat flour" at the grocery store is milled from red wheat. Red wheat has a stronger, more bitter flavor and a darker color. This is the classic whole wheat taste that some people love and others find too aggressive for pizza.
White whole wheat is milled from a different wheat variety (hard white wheat) that has a milder, slightly sweeter flavor. It still contains the full bran, germ, and endosperm - it is nutritionally identical to red whole wheat - but the taste is less assertive. If you have tried whole wheat pizza before and found it too earthy or heavy-tasting, white whole wheat might change your mind.
For pizza specifically, white whole wheat is the easier sell. It gives you the nutritional profile and that pleasant nutty undertone without overpowering the rest of the pizza.
Protein Content
Check the protein content on the bag. For whole wheat pizza flour, you want something in the 13% to 14% range if you can find it. Higher protein means more gluten potential, which helps compensate for the bran damage. King Arthur Whole Wheat Flour runs around 14% protein and is a solid option.
Avoid "whole wheat pastry flour" or anything labeled for cakes or pastries. Those are milled from soft wheat with much lower protein (around 9% to 10%), and they will not give you enough gluten structure for pizza.
Grind Size
Finer-ground whole wheat flour is easier to work with for pizza. The bran particles are smaller, so they do less damage to the gluten network. Some mills offer "whole wheat bread flour" with a finer grind specifically intended for yeasted applications.
If you can find stone-ground whole wheat from a local mill, give it a try. Stone-ground flour tends to have a wider range of particle sizes, which can add a more rustic character. Just be aware that coarser grinds will require more hydration and a longer autolyse.
What About Sprouted Wheat Flour?
Sprouted wheat flour is whole wheat flour made from wheat berries that were germinated before milling. The sprouting process breaks down some of the starches and enzyme inhibitors, making the flour slightly easier to digest and work with. It can produce a softer, more extensible dough compared to regular whole wheat.
The trade-off: sprouted flour ferments faster because the starches are already partially broken down into sugars the yeast can access immediately. If you use sprouted wheat, reduce your yeast slightly or shorten your fermentation window to avoid over-proofing.
The Hydration Fix
This is the single most important adjustment. If you take nothing else from this guide, take this: whole wheat dough needs more water than white flour dough. A lot more.
A typical white flour pizza dough runs 60% to 65% hydration and feels great. Swap in whole wheat flour at that same hydration and you will get a dry, crumbly mess that fights you at every step - mixing, kneading, stretching, all of it.
The bran is the reason. It absorbs a huge amount of water before the gluten proteins even get a chance to hydrate. If you do not account for that, your gluten never fully develops because the water it needs is trapped in the bran.
For any dough with a significant percentage of whole wheat, aim for at least 70% hydration. At 50% whole wheat, 72% to 75% hydration is a better starting point. At 100% whole wheat, some bakers push to 80% or higher.
If you are not used to working with wetter doughs, this is a real adjustment. High-hydration dough is stickier, harder to shape, and requires different handling techniques. The high-hydration pizza dough guide covers all of this in detail - stretch and fold methods, wet hands, bench scrapers, the whole playbook.
One more thing on hydration: the water absorption is not instant. Whole wheat flour, especially coarser grinds, keeps absorbing water over time. A dough that feels too wet at first can feel perfect an hour later. This is why the autolyse step (next section) is not optional.
Softening the Bran: Why Autolyse Is Mandatory
If the bran is shredding your gluten, the obvious solution is to soften the bran before you start building the gluten network. That is exactly what an autolyse does.
An autolyse is dead simple: mix your flour and water together, and then walk away for a while. No yeast, no salt, no kneading. Just flour, water, and time.
During that rest, two things happen:
-
The bran hydrates and softens. Those sharp bran particles absorb water and become less destructive. By the time you start kneading, they are much less likely to slice through your gluten strands.
-
Gluten begins developing on its own. The flour proteins (glutenin and gliadin) start linking up without any mechanical input. This passive gluten development gives you a head start that makes the subsequent kneading shorter and more effective.
For a whole wheat dough, 30 to 60 minutes is the minimum autolyse. Some bakers go as long as 2 to 4 hours, especially with coarser grinds. The longer the autolyse, the softer the bran, the better the final gluten structure.
There is a full breakdown of the technique - including the science of enzyme activation and how it interacts with salt timing - in the autolyse pizza dough guide.
Should You Include Yeast in the Autolyse?
For whole wheat, I recommend a pure autolyse: flour and water only. Adding yeast starts fermentation during the rest, which means gas production is competing with hydration. Adding salt tightens the gluten network prematurely and slows down water absorption. You want the flour to hydrate as freely and completely as possible before either one enters the picture.
After the autolyse, sprinkle the yeast and salt over the dough and incorporate them with the pinch-and-fold method - pinch through the dough, fold it over, rotate, repeat until everything is evenly distributed.
How to Make Whole Wheat Pizza Dough: The Blend Approach
Going 100% whole wheat on your first attempt is a recipe for frustration. The flavor is intense, the dough is unforgiving, and the margin for error shrinks dramatically.
A much better approach: start with a blend and increase the whole wheat percentage over time as you get a feel for how it handles.
Recommended Blending Ratios
30% whole wheat / 70% bread flour - The entry point. This gives you the nutty, slightly earthy flavor of whole wheat while keeping the majority of your gluten network intact. The dough handles almost like a normal high-hydration dough. If you have never made a whole grain pizza crust before, start here.
50% whole wheat / 50% bread flour - The sweet spot for a lot of people. Noticeably wheaty flavor and a more rustic texture, but still enough strong white flour to get a good rise and an open crumb. This is where the dough starts to feel and act differently enough that the autolyse and hydration adjustments become non-negotiable.
75% whole wheat / 25% bread flour - Firmly in whole wheat territory. The flavor is robust. The crumb will be tighter. This requires careful hydration management (74%+ hydration) and a longer autolyse. The 25% bread flour is there as structural insurance.
100% whole wheat - The endgame. A dense, earthy, deeply flavorful crust that will never be as airy as a white flour pizza, but can be excellent in its own right. This is focaccia-adjacent territory - embrace the chew and the weight instead of fighting it. Push hydration to 78% to 80% and autolyse for at least an hour.
For the white flour component, bread flour (12% to 13% protein) is the best partner. Its high protein content adds structure where the whole wheat takes it away. You can also use 00 flour (like Caputo Pizzeria Blue), which works well for Neapolitan-style blends, but its slightly lower protein can make the dough a bit harder to handle at higher WW percentages.
Step-by-Step Framework Recipe
This is not a rigid recipe - it is a framework. Adjust the whole wheat ratio, hydration, and fermentation time based on your flour and your preference.
Target: Four dough balls at ~300g each, 30% whole wheat, 70% hydration
This is a starting point. To generate exact ingredient weights for any number of dough balls, hydration level, or flour blend, the PizzaLogic dough calculator handles all the baker's math automatically.
1. Mix the Flours and Water (Autolyse)
Combine your whole wheat flour and bread flour in a large bowl. Add your water (use room temperature or slightly cool water, especially if you plan to cold ferment - cold water slows premature fermentation during the autolyse).
Mix by hand until there are no dry spots. The dough will look shaggy and rough. That is exactly right - do not knead it at this stage.
Cover and let it rest for 45 to 60 minutes. For 50%+ whole wheat blends, extend this to 60 to 90 minutes.
2. Add Salt and Yeast
Sprinkle the salt and yeast over the autolysed dough. Use the pinch-and-fold method: pinch through the dough with your thumb and fingers, fold it over, rotate the bowl, and repeat. Continue for 3 to 4 minutes until both are fully incorporated.
The dough will feel ragged and broken up at first, then come back together. This is normal.
For yeast amounts with long fermentation times, precision matters. The yeast guide explains how to scale yeast for any fermentation length - and the calculator does the math for you.
3. Develop the Gluten
Whole wheat dough takes longer to develop than white flour dough. Be patient.
If kneading by hand: Use the slap-and-fold technique. Pick the dough up, slap it down on the counter, and fold the far end over the near end. Rotate slightly and repeat. This is more effective than traditional push-and-fold kneading for wet doughs because you are not constantly adding bench flour (which throws off your hydration).
10 to 15 minutes of slap-and-fold, with short rests every few minutes, is typical for a whole wheat blend. The dough will never pass a clean windowpane test the way white flour does - the bran prevents it - but you are looking for the dough to feel cohesive, smooth, and stretchy rather than shaggy and tearing.
If using a stand mixer: Mix on low (speed 1 to 2) with the dough hook for 8 to 12 minutes. Whole wheat dough generates more friction than white dough, so keep an eye on the dough temperature. You do not want it climbing above 78°F to 80°F or fermentation will get ahead of you.
Stretch and fold alternative: Instead of extended kneading, you can do 3 to 4 sets of stretch and folds at 30-minute intervals. This is gentler on the dough and works especially well at higher hydrations. Wet your hands, stretch the dough from one side, fold it over, then rotate and repeat from all four sides. Each set takes 30 seconds. This method builds structure incrementally without overheating or over-working the dough.
4. Bulk Ferment
Let the dough rest at room temperature for 30 to 60 minutes after your final fold or knead. You are looking for a slight increase in volume - maybe 20% to 30% - not a full doubling. The real fermentation happens in the fridge.
5. Divide and Ball
Turn the dough out onto a lightly floured surface (semolina works great here - see the semolina guide for why). Divide into equal portions and shape into tight balls by pulling the edges underneath and pinching the seam shut.
Place each ball into a lightly oiled individual container with a lid, or onto an oiled sheet tray covered tightly with plastic wrap.
6. Cold Ferment
Whole wheat dough benefits enormously from a long, slow cold fermentation. Put the containers in the fridge and leave them there for 24 to 48 hours.
Cold fermentation does several things that are especially important for whole wheat. The extended time gives enzymes in the flour more opportunity to break down starches into sugars, which improves flavor and browning. The cold temperature slows yeast activity so the dough does not over-proof, even with the extra sugars available from the bran and germ. And the prolonged hydration continues to soften the bran, improving the final texture.
24 hours is good. 48 hours is better. Beyond 72 hours, whole wheat dough tends to degrade faster than white flour dough because of the higher enzyme activity from the germ, so do not push it too far. If your dough starts smelling strongly of alcohol or feels slack and sticky after a long ferment, it has gone too far. The cold fermentation guide covers the full day-by-day breakdown of what happens in the fridge and how to read the signs.
7. Warm Up and Stretch
Pull the dough balls out of the fridge 1.5 to 2 hours before you plan to bake. Whole wheat dough takes longer to come to room temperature than white flour dough (the bran acts as insulation), and cold whole wheat dough is extremely resistant to stretching.
When it is ready, the dough should feel soft, supple, and slightly puffy. If it snaps back aggressively when you try to stretch it, give it more time.
Stretch gently using your knuckles and gravity - drape the dough over your fists and let it hang and rotate. Do not use a rolling pin unless you are specifically going for a cracker-thin style. Rolling pins compress the crumb and push out the gas you spent two days building.
Baking Whole Wheat Pizza
Whole wheat crust browns faster than white flour crust. The extra sugars from the bran and germ caramelize and undergo Maillard reactions more aggressively, which means you need to pay closer attention to your bake.
In a home oven (500°F to 550°F on a pizza steel or stone): Bake for 7 to 10 minutes. Start checking at 6 minutes. The bottom will brown quickly on steel, so watch for burning. If you are new to baking on a steel or stone, the pizza stone guide covers setup, preheating, and launch technique.
In a high-heat oven (Ooni, Roccbox, wood-fired): Turn the flame down slightly before launching. Whole wheat crusts can go from golden to charred in seconds at 800°F+. A 60 to 90 second bake with active turning is typical. Keep the flame lower than you would for a white flour Neapolitan.
One thing to expect: the crumb on a whole wheat pizza will always be tighter and more bread-like than a white flour pizza. That is not a flaw - it is a feature. The denser crumb holds up to heavier toppings and sauces better, and the flavor is richer. Lean into it.
Advanced Techniques for Whole Wheat
Once you have the basics dialed in, there are several ways to push the quality further.
Use a Preferment
A poolish or biga made with your white flour component adds another layer of flavor complexity and gives the gluten network a running start. The preferment develops for 12 to 16 hours before you mix the final dough, contributing organic acids, alcohols, and complex sugars that deepen the flavor significantly.
For a 30/70 whole wheat blend, making a poolish with the 70% bread flour portion and then mixing the whole wheat in at the final dough stage is a strong approach. The poolish guide walks through the full process.
Add a Soaker
If you are working with a high percentage of whole wheat (50%+), you can take the autolyse concept a step further with a soaker. A soaker is just the whole wheat flour portion mixed with its proportional share of water and left to sit overnight in the fridge. The next day, you combine the soaked whole wheat with your white flour, yeast, salt, and remaining water.
This gives the bran 8 to 12 hours to fully hydrate before it ever encounters the kneading phase. The result is noticeably less bran damage and a more extensible dough.
Try Tangzhong (Scalded Dough)
Tangzhong is a technique borrowed from Asian milk bread baking. You cook a small portion of your flour and water (about 5% to 10% of the total flour) into a thick paste on the stovetop, then cool it and add it to the rest of the dough. The heat gelatinizes the starches in that portion, which allows them to hold significantly more water.
The practical benefit for whole wheat pizza: a softer crumb, a longer shelf life (the crust stays soft instead of turning stale quickly), and extra moisture retention without making the dough harder to handle. It is not traditional, but it works extremely well.
Why Is My Whole Wheat Dough Not Working? Troubleshooting
The dough is too dense and did not rise much. Check your yeast. Whole wheat dough rises more slowly and less dramatically than white flour dough - that is normal - but it should still show clear signs of fermentation. If it is completely flat, the yeast might be dead, the water might have been too hot, or the salt might have killed the yeast by direct contact.
The dough tears when I try to stretch it. Either the autolyse was too short, the hydration is too low, or the dough is still too cold from the fridge. Give it more time on all three fronts. Also check your whole wheat percentage - at higher ratios, some tearing is inevitable. Work gently and accept that the crust might not stretch as thin as you are used to.
The dough is impossibly sticky. Whole wheat at high hydration will be sticky. Wet hands, bench scrapers, and a light dusting of semolina are your best friends. Do not dump flour into the dough during kneading. That creates dry pockets and throws off your hydration ratio. If the stickiness is truly unmanageable, drop the hydration by 2% to 3% on your next batch and see how it feels.
The crust tastes bitter or grassy. Red whole wheat flour has more tannins than white whole wheat, and short fermentation times do not give the enzymes enough time to mellow those flavors out. Two solutions: switch to white whole wheat flour, or extend your cold fermentation to at least 48 hours. The long ferment smooths out the harsh notes considerably.
The crust is burning before the toppings are done. Whole wheat browns much faster than white flour. Turn your oven temperature down by 25°F or move your steel/stone to a higher rack position. In a pizza oven, keep the flame lower than usual.
The crust came out pale and did not brown. This is more common with over-fermented dough. If the yeast has consumed all the available sugars during an extended ferment, there is nothing left for the Maillard reaction. Add 1% to 2% sugar or diastatic malt powder to your recipe to provide extra browning fuel. This is standard practice for long cold ferments.
Why Bother With Whole Wheat?
Fair question. It is more work, the dough is less forgiving, and the results are never going to be as light and airy as a 00 flour Neapolitan.
But the flavor is in a different league. A well-made whole grain pizza crust has a nutty depth, a toasted complexity, and a sweetness from the long fermentation that white flour simply cannot match. It pairs differently with toppings. Earthy flavors - mushrooms, caramelized onions, roasted garlic, aged cheeses - come alive on a whole wheat base in a way that feels more intentional and complete. Whole wheat is even the foundation of an entire regional style: Colorado-style pizza is built on a honey-sweetened whole wheat crust with a massive braided edge designed to hold an absurd amount of toppings. It is one of the few pizza styles where whole wheat is not a health-conscious substitution but the whole point.
There is also the practical benefit: whole wheat is more filling and more nutritious. A single slice on a whole wheat crust is legitimately more satisfying, which means you eat less and enjoy it more.
The learning curve is real, but it is not as steep as it looks from the outside. Bump your hydration, respect the autolyse, start with a moderate blend ratio, and give the dough time in the fridge. Those four adjustments alone will get you most of the way there. The rest is just reps.
Ready to dial in your whole wheat dough? The PizzaLogic dough calculator lets you set your flour blend, hydration, ball count, and fermentation time, and it spits out exact ingredient weights with step-by-step instructions. No baker's math required.